
Tendon Glides for Hand and Finger Mobility
Free Printable Hand and Wrist Exercise Program
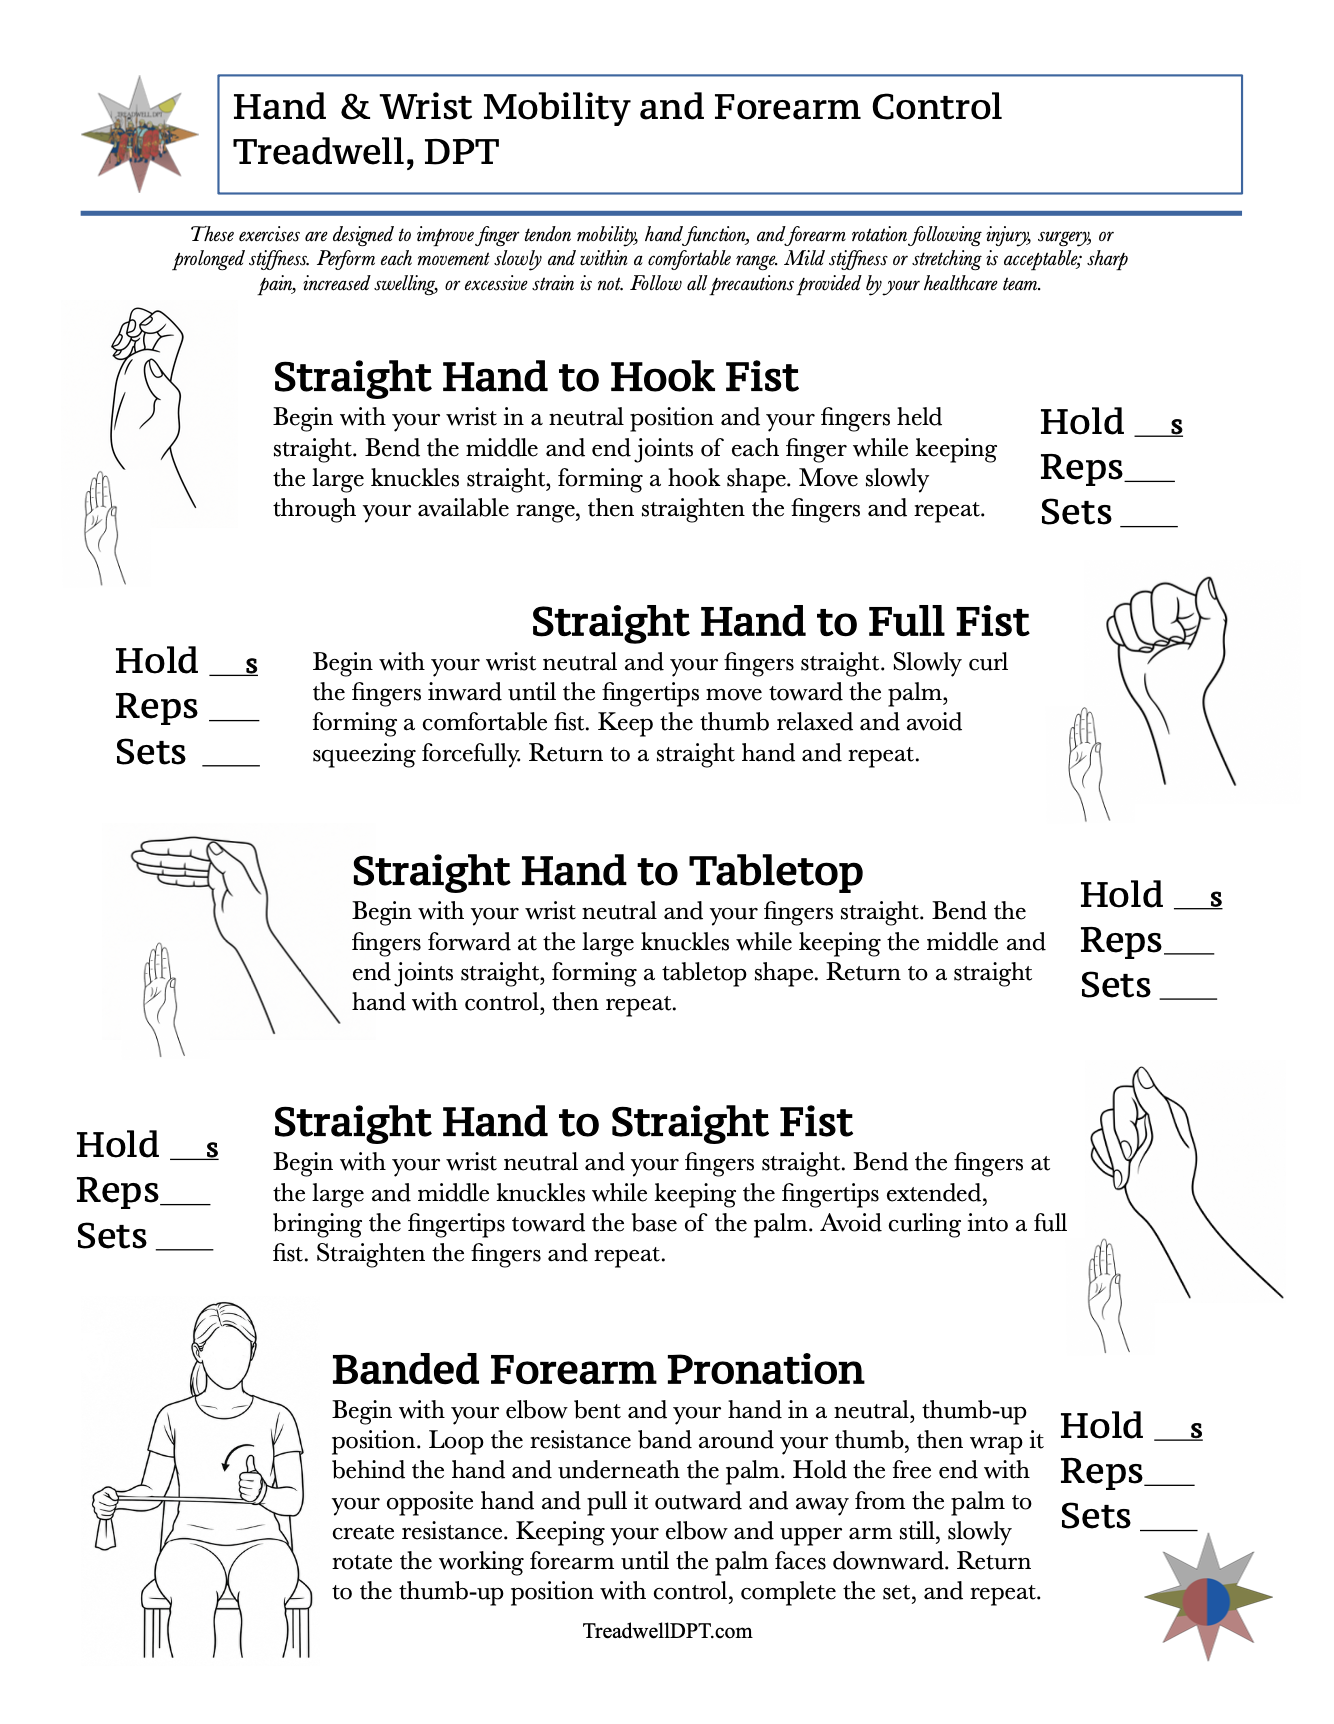
Hand and finger stiffness can make gripping, writing, typing, dressing, cooking, and other everyday activities surprisingly difficult. Tendon glide exercises gently move the fingers through several distinct positions to promote flexor tendon movement, maintain joint mobility, and improve overall hand function.
This free tendon glide home exercise program from Austin Treadwell, DPT includes four foundational finger movements along with banded forearm pronation for additional wrist and forearm control.
[Download the Free Tendon Glides PDF]
What Are Tendon Glides?
The tendons that bend your fingers travel through protective tunnels called tendon sheaths. As your fingers move, these tendons must slide smoothly within the hand and wrist.
Tendon gliding exercises place the fingers in different positions to change how the flexor tendons move relative to one another and the surrounding tissues. These movements are commonly used in hand rehabilitation to address stiffness, restore movement, and support functional use of the hand.
The American Society for Surgery of the Hand includes straight-hand, tabletop, hook-fist, straight-fist, and full-fist positions among its differential tendon-gliding exercises.
Potential Benefits of Tendon Glide Exercises
A properly selected tendon glide program may help:
Maintain or improve finger range of motion
Encourage smooth movement of the finger flexor tendons
Reduce hand and finger stiffness
Improve coordination between different finger joints
Restore comfortable gripping and grasping
Support recovery following certain hand or wrist injuries
Improve movement after periods of immobilization
Prepare the hand for everyday tasks
The appropriate exercises and dosage depend on your injury, surgical procedure, healing stage, and current movement restrictions.
The Tendon Glide Exercises
1. Straight Hand to Hook Fist
Begin with your wrist neutral and your fingers held straight. Bend the middle and end joints of each finger while keeping the large knuckles straight. This creates a hook-shaped position.
Move slowly through your available range before returning to the straight-hand position.
The hook fist emphasizes movement at the middle and end finger joints while limiting motion at the large knuckles.
2. Straight Hand to Full Fist
Begin with your wrist neutral and your fingers straight. Slowly curl the fingers inward until the fingertips move toward the palm.
Keep the thumb relaxed and avoid squeezing the fist forcefully. Return to a straight hand with control and repeat.
The full fist combines movement across the large, middle, and end joints of the fingers.
3. Straight Hand to Tabletop
Begin with your wrist neutral and your fingers straight. Bend the fingers forward at the large knuckles while keeping the middle and end joints straight.
This creates a tabletop—or intrinsic-plus—hand position. Return to the starting position slowly and repeat.
4. Straight Hand to Straight Fist
Begin with your wrist neutral and your fingers straight. Bend the large and middle finger joints while keeping the fingertips extended.
Bring the fingertips toward the base of the palm without curling into a full fist. Straighten the fingers and repeat.
Because the straight fist differs from the full fist and hook fist, it provides another way to encourage differential movement within the hand.
Banded Forearm Pronation
The program also includes banded forearm pronation to improve rotational control of the wrist and forearm.
Begin with your elbow bent and your working hand in a neutral, thumb-up position. Loop a resistance band around the thumb, wrap it behind the hand and underneath the palm, and pull the free end outward with your opposite hand.
Keep the elbow and upper arm still as you rotate the forearm until the palm faces downward. Return to the thumb-up position with control.
This movement is separate from the finger tendon-glide sequence but may be useful when wrist or forearm rotation is also limited.
How Often Should You Perform Tendon Glides?
Your repetitions, hold time, and daily frequency should be based on the instructions provided by your physical therapist, occupational therapist, surgeon, or other healthcare provider.
Move slowly and remain within a comfortable range. Mild stiffness or stretching may be expected, but the exercises should not be forced.
Stop and consult your healthcare provider if you experience:
Sharp or increasing pain
New numbness or tingling
Increased swelling
Worsening catching or locking
Loss of movement
Stress around a healing incision or surgical repair
If you recently underwent tendon repair or another hand surgery, follow your surgical precautions carefully. Advancing hand exercises too quickly can place unnecessary stress on healing tissue.
This printable hand and wrist exercise sheet includes:
Straight hand to hook fist
Straight hand to full fist
Straight hand to tabletop
Straight hand to straight fist
Banded forearm pronation
Written setup and movement instructions
Space for personalized holds, repetitions, and sets
[Download the Printable Tendon Glides HEP]
You can print the handout or save it to your phone for convenient reference during your home exercise program.
When Hand Stiffness Needs More Than a Home Exercise Program
A general hand exercise program can provide a useful starting point, but persistent stiffness often requires a more individualized assessment.
Pain, swelling, scar restriction, weakness, limited tendon movement, joint stiffness, nerve irritation, and surgical precautions can all change which exercises are appropriate. Physical therapy can help determine what is limiting your movement and build a more specific progression around your current needs.
Hand and Wrist Physical Therapy in Minneapolis
Treadwell, DPT provides individualized physical therapy for people experiencing hand, wrist, forearm, and upper-extremity movement limitations in Minneapolis and the greater Twin Cities area.
Treatment may include:
Individualized mobility exercises
Progressive hand and forearm strengthening
Functional gripping and carrying activities
Wrist and forearm range-of-motion training
Movement education
Personalized home exercise programming
Return-to-work, fitness, and daily-activity preparation
If your hand still feels stiff, weak, or difficult to use following an injury, surgery, or period of immobilization, an individualized assessment can help identify the next step.
[Schedule a Physical Therapy Visit]
Frequently Asked Questions
What is the difference between a tendon glide and a hand stretch?
A hand stretch generally places tissue in a sustained lengthened position. Tendon glides move the fingers through several controlled positions to change how the tendons travel within the hand.
Can tendon glides help stiff fingers?
Tendon glides are commonly incorporated into rehabilitation programs for hand and finger stiffness. Their usefulness depends on the source of the stiffness and whether any movement precautions are present.
Should tendon glides hurt?
Tendon glides should generally feel controlled and comfortable. Do not force your fingers into a position. Stop if you experience sharp pain, increasing swelling, or worsening symptoms.
Can I perform tendon glides after hand or wrist surgery?
Only if the exercises are consistent with your surgeon’s or therapist’s protocol. The timing and permitted range of motion can vary significantly depending on the procedure.
Are tendon glides used for carpal tunnel syndrome?
Tendon and nerve-gliding exercises may be included in some conservative carpal tunnel programs, but they are not appropriate for every person or every source of hand symptoms. The AAOS includes tendon-gliding exercises within its therapeutic exercise resources for carpal tunnel syndrome. American Academy of Orthopaedic Surgeons
When should I see a physical therapist?
Consider an evaluation if stiffness is persistent, your movement is worsening, daily activities remain difficult, or you are unsure which exercises are safe following an injury or surgery.

A modern take on the classic pain scale used in physical therapy & rehab settings—reimagined with personality.
This funny physical therapy shirt is inspired by the classic pain scale used in clinics to measure discomfort and recovery progress. The “How’re You Feeling?” tee brings that everyday rehab question into a wearable, streetwear-style design for patients, clinicians, and gym-goers.
Fabric:100% cotton
Fabric Weight:10.3 oz/yd² (350 g/m²)
Fabric Thickness:Thick
Care Instructions:Machine wash at 30°C (gentle cycle); Do not bleach; Tumble dry low; Iron at low temperature, avoid ironing on print; Do not dry clean
Notes:Minor batch differences can occur during blank garment production due to variations in fabric, dye and processing. This is common in apparel manufacturing, and we work hard to keep every item consistent.
NO REFUNDS/EXCHANGES
